
Roasting a whole chicken in the oven remains one of the most rewarding culinary skills a home cook can master. The technique transforms an ordinary poultry piece into a centerpiece-worthy meal with golden, crispy skin and tender, juicy meat beneath. Understanding the right balance of temperature, timing, and technique separates a disappointing result from a memorable one.
Whether you’re preparing a Sunday family dinner or an elegant holiday spread, this guide covers everything from basic temperature settings to advanced seasoning techniques. The approach draws on established culinary standards and tested recipes to help you achieve consistent results every time you reach for that roasting pan.
How Long and at What Temperature to Cook Poulet Entier au Four?
The foundation of perfect roast chicken lies in two numbers: temperature and time. Most recipes agree that 400–425°F (200–220°C) delivers the best balance of crispy skin and thorough cooking. At this heat range, a whole chicken typically requires 15–25 minutes per pound, though multiple factors can shift this estimate significantly.
15 mins
60–90 mins
4–6
Easy
Several key factors influence exact timing. Oven type matters considerably—convection ovens run roughly 25°F hotter than conventional ones, meaning you should reduce the temperature by that margin or expect faster cooking. Chicken weight varies naturally, and even half a pound makes a difference in total time.
- Pat the chicken completely dry before seasoning for skin that actually crisps
- Use a meat thermometer rather than relying on timing alone
- Allow the chicken to rest 10–30 minutes after removing from oven
- High-heat starting temperature (425°F) followed by a reduction works best
- Baste with pan juices every 30–40 minutes for moisture and color
- Rotate the pan halfway through for even browning
- Learn your specific oven’s behavior through repeated practice
| Weight | Temperature | Approximate Time | Internal Temp |
|---|---|---|---|
| 3–3.5 lb (1.4–1.6 kg) | 425°F (220°C) | 45–55 minutes | 165°F (75°C) |
| 4 lb (1.8 kg) | 400–425°F (200–220°C) | 60–80 minutes | 165°F (75°C) |
| 4.5 lb (2 kg) | 425°F (220°C) | 55–65 minutes | 165°F (75°C) |
| 5–6 lb (2.3–2.7 kg) | 425°F (220°C) | 75–90 minutes | 165°F (75°C) |
The spatchcock method offers a notable time reduction for those seeking faster results. By butterflying the chicken to lay flat, cooking time drops to approximately 12 minutes per pound—meaning a 4-pound bird finishes in around 48 minutes. This technique also promotes more even cooking throughout the breast and thighs simultaneously.
How to Prepare a Whole Chicken for Roasting in the Oven
Initial Preparation Steps
Proper preparation starts before the chicken ever touches the oven. First, remove the giblets packaged inside the cavity—these are typically stored in a plastic bag and can be reserved for gravy or stock if desired. Pat the entire exterior dry with paper towels, paying special attention to the skin around the breast and thighs.
This drying step proves essential. Moisture on the skin creates steam during cooking, which prevents browning and produces that undesirable flabby texture. Taking an extra minute or two with the paper towels pays dividends in the final result. Some cooks even let the chicken air-dry uncovered in the refrigerator for several hours before roasting.
Should You Truss the Chicken?
Trussing involves tying the legs together and tucking the wing tips beneath the body. While not strictly required, this technique offers several advantages. A trussed chicken maintains a more compact, evenly shaped form that cooks more uniformly. The exposed breast area stays closer to the heat source, promoting better browning across the entire surface.
Trussing also creates an aesthetically pleasing presentation when the chicken emerges from the oven. Use kitchen twine to tie the ankles together, then cross the twine over the breast and tie beneath the wings to secure everything in place.
That said, skipping the truss doesn’t ruin the outcome. Some cooks prefer the more relaxed, rustic appearance of an untrussed bird. The cooking time remains largely unaffected, though the shape may look less uniform on the platter.
Seasoning the Cavity and Exterior
Seasoning happens in two stages: inside the cavity and across the exterior surface. For the cavity, add roughly half a teaspoon of salt along with aromatics like lemon halves, garlic cloves, fresh herbs such as thyme or rosemary, sliced onion, or additional citrus. These ingredients infuse the bird from the inside out while releasing steam and fragrance during cooking.
The exterior requires more generous treatment. Apply approximately one and a half teaspoons of salt total, along with freshly ground pepper. Rub softened butter or olive oil (about 2–3 tablespoons) across all surfaces, working it gently beneath the skin where possible. Adding lemon zest introduces bright, citrusy notes that complement the rich poultry flavors.
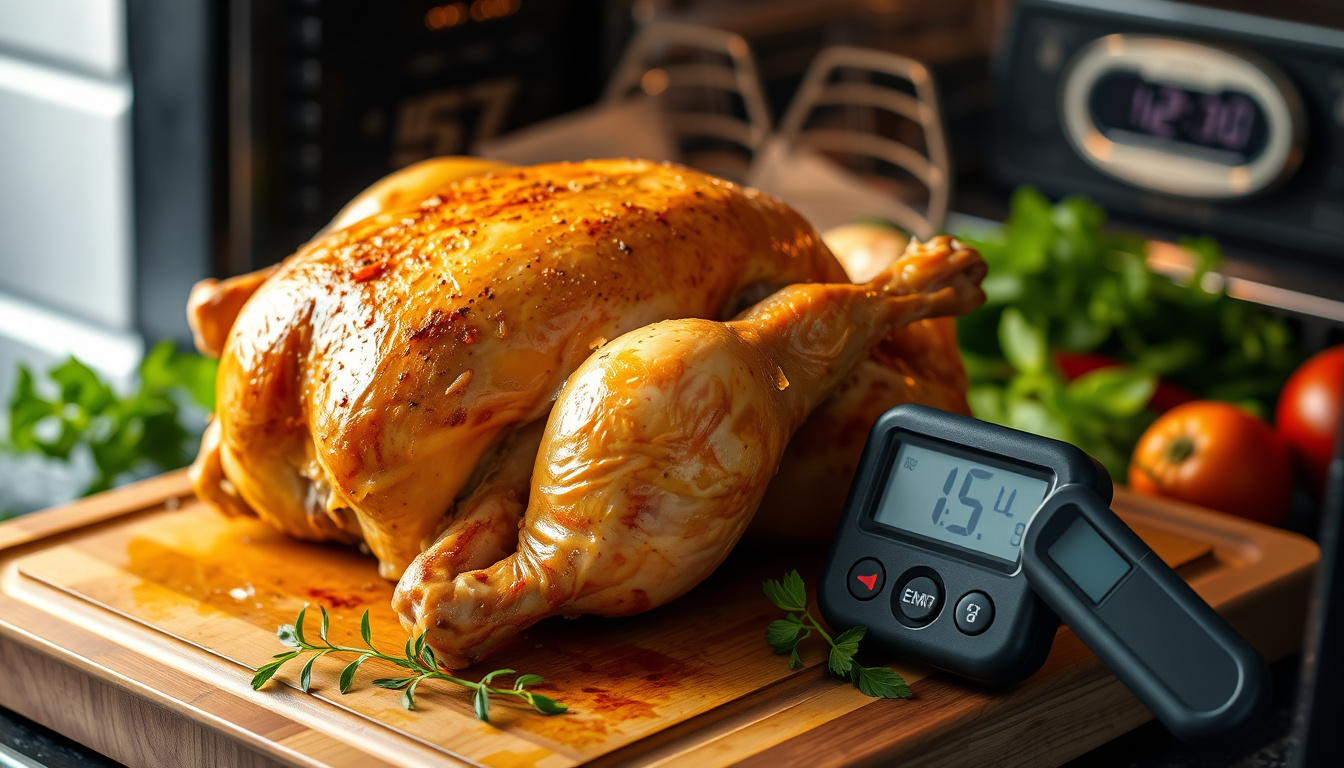
How to Know When Your Whole Roasted Chicken is Done and Safe
Using a Meat Thermometer Correctly
The United States Department of Agriculture establishes 165°F (75°C) as the safe internal temperature for poultry. This measurement must be taken in the thickest part of the thigh, avoiding contact with the bone, which can register falsely high readings. Multiple temperature checks across different areas—breast, thigh, and wing—provide the most reliable confirmation.
Relying solely on cooking time represents a common pitfall. Ovens vary significantly in their actual temperatures, and a cold-starting chicken takes longer than one placed in a preheated environment. The USDA advises against using visual cues alone, as the color of meat and juices can appear done well before harmful bacteria have been eliminated.
Never rely on time alone to determine doneness. A meat thermometer inserted correctly remains the only reliable method for confirming that poultry has reached a safe temperature throughout.
The Importance of Resting
After removing the chicken from the oven, tent it loosely with aluminum foil and allow it to rest for 10–30 minutes before carving. During this period, residual heat continues to cook the interior while the juices redistribute throughout the meat. Cutting too soon results in those valuable juices running out onto the cutting board rather than into the meat itself.
The resting period also provides a buffer zone—temperatures continue rising slightly (carryover cooking) during this time, which can push a bird that registered 162°F to the target 165°F. This means you might pull the chicken slightly below the official threshold if you plan for adequate resting time.
Best Seasonings and Tips for Perfect Poulet Entier au Four
Simple and Enhanced Seasoning Approaches
Basic seasoning requires only salt, pepper, and a fat medium like butter or olive oil. This combination allows the natural flavor of the poultry to shine while providing enough seasoning for an enjoyable meal. The key lies in applying enough salt—under-seasoned roasted chicken tastes flat and unremarkable compared to its properly seasoned counterpart.
Enhanced seasoning builds on this foundation with additional aromatics. Minced or powdered garlic, lemon or orange zest, and fresh herbs expand the flavor profile considerably. Stuffing the cavity with quartered lemons, whole garlic cloves, and herb sprigs creates an aromatic pocket that perfumes the meat from within. Many cooks recommend being generous with these additions, particularly for larger birds weighing four to five pounds.
Common Mistakes to Avoid
Skipping the dry pat creates steamed skin. Opening the oven door repeatedly drops the temperature and extends cooking time. Failing to use a thermometer risks both undercooking (food safety hazard) and overcooking (dry, tough meat).
Overchecking the oven disrupts the cooking environment. Instead of opening the door to check progress, use the window if your oven has one. Each door opening releases heat and forces the oven to work harder to recover, potentially extending total cooking time by significant margins.
Advanced Techniques for Better Results
The high-heat start method, popularized by Serious Eats and aligned with BBC Good Food recommendations, involves beginning at 425–450°F for the first 15–20 minutes to rapidly crisp the skin. Then reduce the temperature to 375°F for the remainder of cooking. This approach produces the deeply golden, shatteringly crisp exterior that distinguishes professional-quality roast chicken. For a foolproof béchamel sauce recipe, check out Recepta de salsa beixamel infal·lible.
Dry brining represents another technique worth considering. By applying salt to the chicken 24–48 hours in advance and allowing it to sit uncovered in the refrigerator, you draw moisture out of the skin while the salt gradually penetrates the meat. The result is both crispier skin and more flavorful, juicier meat throughout.
From Prep to Plate: A Complete Timeline
- Preparation (0–15 minutes): Remove giblets, pat dry, season cavity, truss if desired, apply exterior seasoning, let sit at room temperature for 30–60 minutes
- High-heat start (15–20 minutes): Roast at 425°F (220°C) to begin crisping the skin
- Reduced heat cooking (45–75 minutes): Lower to 375°F (190°C), baste every 30 minutes, rotate pan halfway through
- Temperature check (final 10 minutes): Insert thermometer in thickest part of thigh; target 165°F (75°C)
- Resting period (10–30 minutes): Remove from oven, tent with foil, allow juices to redistribute
- Carving and serving: Cut at joints, separate breast from thighs and wings, serve immediately or store properly
This timeline assumes a 4–5 pound chicken cooked in a conventional oven. Adjustments for smaller or larger birds follow the time-per-pound guidelines provided earlier. Practice and familiarity with your specific oven will refine these estimates over time.
What We Know for Certain and What Remains Variable
| Established Facts | Variable Factors |
|---|---|
| Safe internal temperature: 165°F (75°C) | Exact cooking time varies by weight, oven type, and starting temperature |
| Drying the skin is essential for crispiness | Convection ovens cook faster; temperatures may need adjustment |
| Resting after cooking preserves juices | Individual oven calibration differs; timing estimates are approximate |
| High heat (425°F) produces best browning | Optimal seasoning amounts depend on personal taste preferences |
The science of food safety provides clear, non-negotiable parameters: temperature and time that eliminate pathogens. What remains genuinely variable involves the countless techniques, preferences, and equipment differences that affect how you reach that endpoint. Embracing this variability means accepting that your first attempt may need adjustment before matching the results of experienced cooks who have refined their approach through repetition.
Why This Method Works: The Science of Roasting
High-heat roasting exploits a fundamental principle: dry heat causes the proteins and fats in poultry skin to undergo the Maillard reaction, producing that distinctive golden-brown color and complex flavor compounds. This process requires surface moisture to evaporate first, which is precisely why thorough drying matters so much.
The relatively long cooking time at moderate temperatures allows heat to penetrate evenly through the dense muscle tissue of the thighs and breast without overcooking the outer layers. By starting hot and finishing moderate, you achieve both objectives: rapid surface browning followed by gentle interior cooking that leaves meat tender rather than tough.
Alternatives like air fryer preparations can produce similar crispy-skin results in less time, though the traditional oven method remains the standard for producing a classic presentation suitable for family gatherings and special occasions alike.
Expert Sources and Culinary Standards
The roast chicken is perhaps the most useful dish in the repertoire. Done properly, it is also one of the most delicious. The skin should be mahogany-colored, thin and crispy, and burnished like leather; the flesh beneath should be silky and suffused with the meaty, quintessential essence of bird.
— BBC Good Food, Simple Roast Chicken Recipe
Culinary authorities including the USDA Food Safety and Inspection Service, BBC Good Food, and Serious Eats converge on several core recommendations: dry skin, high initial heat, reliable temperature verification, and adequate resting time. These sources represent thousands of hours of testing and refinement, providing a reliable foundation for home cooks seeking consistent results.
For those interested in exploring related baking techniques, learning to work with buttercream frostings shares similar precision requirements—as explored in this guide to frosting cakes smoothly.
The Bottom Line on Poulet Entier au Four
Roasting a whole chicken successfully comes down to mastering a handful of core principles: thorough drying, proper seasoning, reliable temperature monitoring, and adequate resting. The exact timing varies based on weight, oven characteristics, and chosen method, but the target endpoint of 165°F (75°C) remains constant regardless of approach.
Starting with a quality bird, respecting the cooking process without constant interruption, and allowing proper rest time transforms a simple protein into a memorable meal. Practice builds intuition—each attempt teaches you more about your specific oven, your preferred doneness level, and the techniques that produce your ideal result.
Frequently Asked Questions
What temperature should I set my oven to for roast chicken?
Most recipes recommend 400–425°F (200–220°C) for roasting whole chicken. This range produces crispy skin while ensuring thorough cooking throughout. Convection ovens typically run 25°F hotter, so reduce temperature accordingly or monitor for faster-than-expected results.
How do I know when the chicken is fully cooked?
A meat thermometer inserted into the thickest part of the thigh (avoiding bone) must read 165°F (75°C) according to USDA guidelines. Visual cues like golden skin or clear juices are unreliable indicators—only temperature verification provides certainty.
How long should I let the chicken rest before carving?
Allow 10–30 minutes of resting time tented with foil after removing from the oven. This allows juices to redistribute throughout the meat, resulting in moister slices. Cutting too soon causes those juices to escape onto the cutting board.
Do I need to truss the chicken before roasting?
Trussing is optional but recommended. Tying the legs together and securing the wings produces a more compact, evenly shaped bird that browns uniformly. However, skipping this step won’t ruin the result—some cooks prefer the rustic appearance of an untrussed chicken.
What herbs work best for seasoning roast chicken?
Classic choices include thyme, rosemary, sage, and parsley. Stuff the cavity with lemon halves, garlic cloves, and herb sprigs for interior flavor. Fresh herbs generally provide more vibrant taste than dried alternatives applied to the exterior.
Related stories


Jessica Morin is Provincial Affairs Editor at Toronto Post, covering Ontario policy, provincial politics and regional economics.